Hack the Router! Technicolor DGA4132
Let's start saying that I hate throwing away working stuff, especially if it means producing useless e-waste.
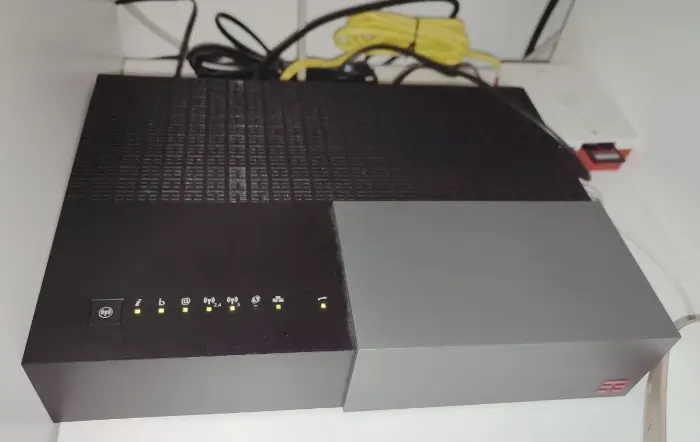
So, I found myself owning two vendor-locked routers, given to me by my previous ISPs, Fastweb and TIM (yes, I am based in Italy). The models were both Technicolor and both very similar: DGA4131, also known as FASTGate, and DGA4132, also known as TIM HUB.
Since they looked like capable models, I decided to search if they actually were any good and if there was any possibility to free them from the vendor lock. Not only I discovered they were better than my current model (a TP-Link Archer VR1210v), but also that there existed a project to hack them called Hacking Technicolor Gateways.
Although the model are quite the same, I chose to use the DGA4132 (TIM HUB) purely due to its shape: it is more like a brick and can be hung on the wall, whereas the DGA4131 (FASTGate) is made to stand on a surface.
I decided to document my journey to this router unlocking process, since most of the documentation is in Italian and I also wanted to compile a vademecum for the future me in case I needed it.
Hacking 101 - First steps
A summary of the equipment you'll need to perform the feat:
- The router itself (duh!)
- Its power supply (or a 18v/3A equivalent)
- An ethernet cable
- A Linux, Windows or Mac computer with an ethernet port (a USB adapter is good as well)
- A working internet connection (different from the one you are configuring)
Hacking procedure
Check your firmware version
Making things short, there are three types of firmwares that can be loaded on your router:
- Type 1: you are halfway there, you can load a Type 2 and root from there
- Type 2: that is the firmware you want on the DGA4132, it is directly rootable, so most of the hassle is already done
- Type 3: complicated stuff, we won't consider this case in the scope of this guide
In order to check which version you have, log in to the router interface (usually its http://192.168.1.1) and take note of the firmware version. It should be something like 2.1.0_003.
Then go to the Hacking Technicolor Gateways firmware page for DGA4132 and identify the firmware with the version you took note of before.
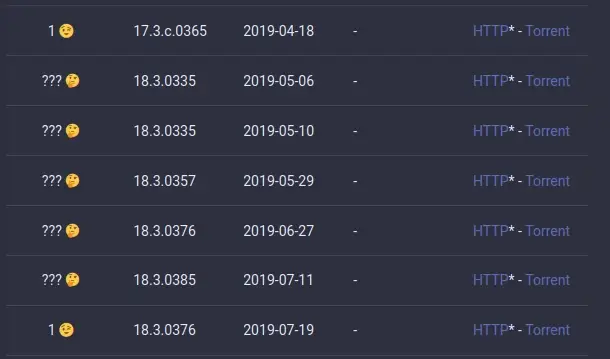
Unfortunately, versions are not explicitly written into the table, but you should hover on the HTTP or Torrent links to compare. Once you identified your version, the first column will tell you which Type your firmware is and the second column will give you the Homeware version.
Homeware is the name of Technicolor router OS. It is based on some version of OpenWrt, so it retains 90% of the compatibility. Below, there is a table explaining the forking.
| Homeware | OpenWrt | DGA4132 |
|---|---|---|
| 17 | < 15 | <= 2.0.0 |
| 18(.3) | 15.05.1 | >= 2.1.0 |
| 19 | r13941 (between 19 and 21) | >= 2.3.0 |
If you obtained:
- Type 1 and your firmware version is >= 2.0.0: proceed with the method I am proposing below.
- Type 1 and your firmware version is < 2.0.0: proceed with the method I am proposing below (but when noted follow the additional instructions).
- Type 2: good to go, just skip the Type 2 firmware flashing and proceed to the actual rooting.
- Type 3: outside the scope of this guide (if interested you can look this forum topic).
Right now you are probably wondering what you should do if you obtained a ??? Type; well, probably nobody tested that version that well, so it is safer to treat it as a Type 3.
Downloading firmwares
Before starting to get the hands dirty, some files are needed on your local hard drive. I am dedicating a section to this, since it is not easy to get hold of them. If you noticed, in the screenshot above, the HTTP download is marked with a * and that is because you can download firmwares over HTTP only if you are under TIM network.
In the contrary case, you should resort to Torrent. I believe there already are a ton of tutorials on how to set up a torrent client, so I won't be writing another.
You should download:
- 1.0.3_CLOSED (only if you currently are on a Type 1)
- 2.2.3_CLOSED
Changing firmware (only for Type 1)
In order to change the firmware to a Type 2 firmware, such as the 1.0.3_CLOSED, it is necessary to perform the following steps:
- Reach to the back of your DGA4132 and take note of the "Access Key" written there, typically on the lower right.
- Go to the router login page, that if you didn't change any settings is at http://192.168.1.1.
- Once there, insert
adminas username and your access key as password. - In the "Gateway" section of the interface you should be able to see the function to update your firmware manually.
- From there just select the 1.0.3_CLOSED
.rbifile that you downloaded earlier and proceed with the flashing. - Finally reset the DGA4132 to factory settings using the pinhole on the back.
Rooting
The actual rooting process is very simple compared to all we did on the way here. You'll be using a tool called AutoFlashGUI.
AutoFlashGUI is written using the Python language, so a necessary step is to configure the Python environment in order to install the necessary dependencies. I won't guide you through the install of Python, there already are a lot of nice tutorials out there. This is the official guide. Be sure to install a recent version of Python (starting from Python 3.7) together with the included graphical library based on Tkinter.
Then, I'll assume a Python interpreter is installed, available in your PATH and you are running on something resembling a terminal (a Windows CMD, a Linux or Mac bash or even a simple sh).
First of all, let's begin by downloading the actual utility code clicking here. The decompress the archive to a folder of your choice. For this tutorial ~/download/autoflashgui will be used.
Navigate to the aforementioned directory and create a virtualenv to contain all the dependencies:
cd ~/donwload/autoflashgui
python -m venv .venv
source .venv/bin/activate
pip install robobrowser==0.5.3
The you can finally start the program, from the very same terminal window:
python autoflashgui.pyA window just like the following should appear.
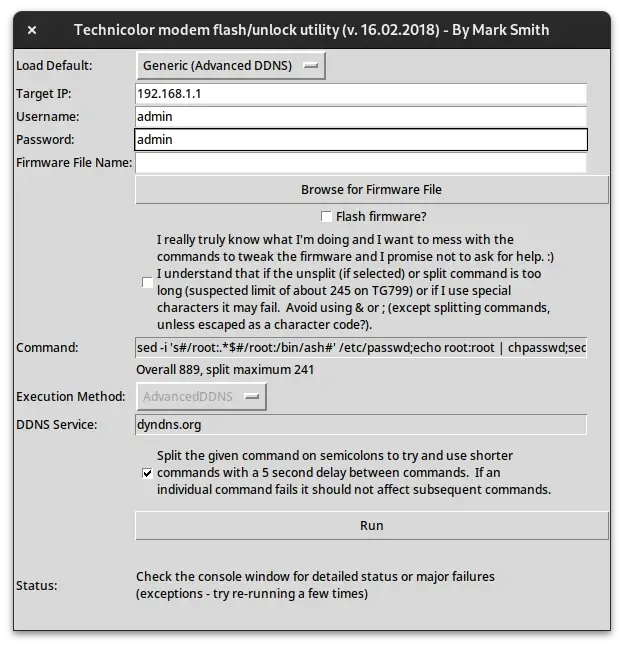
Be sure to have all configured as in the image:
- Select "Generic (Advanced DDNS)".
- Use
192.168.1.1as Target IP. - Username should be
admin. - Password should be
adminas well. - Be very sure the the "Flash firmware?" option is empty and deactivated.
Finally just click the "Run" button and wait. Do not turn the router off or do anything else, just wait for the process to complete.
In order to check if everything went according to plan, we need to log in to the system using a secure remote shell called SSH. Since in 2023 a SSH client is available in most OSes as the ssh executable, I won't cover the installation process.
Unfortunately the Homeware OS does not use a full blown version of OpenSSH, but a lighter and smaller alternative called Dropbear. Due to this reason, some more configuration is needed.
Under your home directory (user directory for the Windows folks) create the .ssh folder and inside of that a config file:
mkdir ~/.ssh
touch ~/.ssh/config
With whatever editor you like, write this contents to the file:
Host router
    User root
    HostName 192.168.1.1
    HostKeyAlgorithms=+ssh-rsa
    KexAlgorithms=+diffie-hellman-group1-sha1
Now you should be able to access your router with the following command:
ssh router
root@192.168.1.1's password:
If you obtain a prompt similar to the following, the rooting procedure went well:
BusyBox v1.23.2 (2020-04-24 18:04:19 UTC) built-in shell (ash)

  _______              __           __              __
 |_     _|.-----.----.|  |--.-----.|__|.----.-----.|  |.-----.----.
   |   |  |  -__|  __||     |     ||  ||  __|  _  ||  ||  _  |   _|
   |___|  |_____|____||__|__|__|__||__||____|_____||__||_____|__|
                 N E X T   G E N E R A T I O N   G A T E W A Y
 --------------------------------------------------------------------
 NG GATEWAY SIGNATURE DRINK
 --------------------------------------------------------------------
  * 1 oz Vodka          Pour all ingredients into mixing
  * 1 oz Triple Sec     tin with ice, strain into glass.
  * 1 oz Orange juice
 --------------------------------------------------------------------


Software program:

Copyright � 2018 - Technicolor Delivery Technology SAS and/or its Group Company (Technicolor)

All Rights Reserved


This program contains proprietary information which is a trade secret of Technicolor
and also is protected by intellectual property as an unpublished work
under applicable Copyright laws/right of authorship.

This program is also subject to some patent and pending patent applications.
Technicolor� is registered trademark and trade name of Technicolor group company,
and shall not be used in any manner without express written from Technicolor.

The use of the program and documentation is strictly limited to your own internal
evaluation of the product embedding such program, unless expressly agreed otherwise
by Technicolor under a specific agreement.

Recipient is to retain this program in confidence and is not permitted to use
or make copies thereof other than as permitted in a written agreement with Technicolor,
unless otherwise expressly allowed by applicable laws.

Recipient is not allowed to make any copy, decompile, reverse engineer, disassemble,
and attempt to derive the source code of, modify, or
create derivative works of the program, any update, or any part thereof.

Any violation or attempt to do so is a violation of the rights of Technicolor.
If you or any person under your control or authority breach this restriction,
you may be subject to prosecution and damages.
Now we can proceed to the next section, which is bank planning. The following sections are taken and directly paraphrased from the Hacking Technicolor Gateways itself.
Bank planning (original)
The DGA4132 router has two "banks", that to say two zones of memory where two different firmware versions can lay and that you can boot from. In order to make use of all the available software and mods, you should maintain your router always in the optimal bank configuration.
The optimal bank plan should look something like this:
/proc/banktable/active
bank_1
/proc/banktable/activeversion
Unknown
/proc/banktable/booted
bank_2
/proc/banktable/bootedversion
xx.x.xxxx-...
Summarizing: bank 1 should be active and left alone, bank 2 will be used to boot from and apply all the sweet software stuff.
To check your current bank plan, launch:
find /proc/banktable -type f -print -exec cat {} ';' -exec echo ';'If the output does not match the above, just lunch the following very long script:
# Ensure two banks match in sizes
[ $(grep -c bank_ /proc/mtd) = 2 ] && \
[ "$(grep bank_1 /proc/mtd | cut -d' ' -f2)" = \
"$(grep bank_2 /proc/mtd | cut -d' ' -f2)" ] && {
# Clone and verify firmware into bank_2 if applicable
[ "$(cat /proc/banktable/booted)" = "bank_1" ] && {
mtd -e bank_2 write /dev/$(grep bank_1 /proc/mtd | cut -d: -f1) bank_2 && \
echo Verifying ... && \
[ $(sha256sum /dev/$(grep bank_1 /proc/mtd | cut -d: -f1) /dev/$(grep bank_2 /proc/mtd | cut -d: -f1) | cut -d' ' -f1 | sort -u | wc -l ) -eq 1 ] || \
{ echo Clone verification failed, retry; exit; } }
# Make a temp copy of overlay for booted firmware
cp -rf /overlay/$(cat /proc/banktable/booted) /tmp/bank_overlay_backup
# Clean up jffs2 space by removing existing old overlays
rm -rf /overlay/*
# Use the previously made temp copy as overlay for bank_2
cp -rf /tmp/bank_overlay_backup /overlay/bank_2
# Activate bank_1
echo bank_1 > /proc/banktable/active
# Make sure above changes get written to flash
sync
# Erase firmware in bank_1
mtd erase bank_1;
# Emulate system crash to hard reboot
echo c > /proc/sysrq-trigger; }
# end
Now you router should slowly reboot. Once up again, launch the following again to check if the optimal bank configuration has been reached:
find /proc/banktable -type f -print -exec cat {} ';' -exec echo ';'Let's now upgrade to a more recent version of the DGA4132 firmware.
Upgrade to a recent firmware (original)
Since to root the devices, you probably have downgraded your device to an older version, now it is the time to safely update it, while retaining the root access. Obviously this is not a mandatory step, but since routers in a home environment are often the last barrier to the Internet, the more updates the better.
In the "Downloading firmwares" section, I told you to download firmware version 2.2.3_CLOSED. That is because it is the last version still working with the stable version of Answel custom GUI that will be installed in the next chapter.
You will need to copy files to the devices and for that you need to use scp -O which tells scp to use the old SCP protocol instead of the newer SFTP, unsupported on Homeware.
As a first step, let's do a backup of the current and working configuration. SSH into the device and launch:
tar -C /overlay -cz -f /tmp/backup-$(date -I).tar.gz $(cat /proc/banktable/booted)Then on your local machine SCP the backup:
scp -O router:/tmp/backup-$(date -I).tar.gz .Now the updating process can start. I'll assume you have the .rbi file at ~/download/2.2.3_CLOSED.rbi. So, copy the firmware to the device /tmp/ folder:
scp -O ~/download/2.2.3_CLOSED.rbi router:/tmp/new.rbiThen SSH into the device and extract it:
cat "/tmp/new.rbi" | (bli_parser && echo "Please wait..." && (bli_unseal | dd bs=4 skip=1 seek=1 of="/tmp/new.bin"))Erase all the current configuration from the device:
rm -rf /overlay/$(cat /proc/banktable/booted)Finally launch this big command to secure root access:
mkdir -p /overlay/$(cat /proc/banktable/booted)/etc
chmod 755 /overlay/$(cat /proc/banktable/booted) /overlay/$(cat /proc/banktable/booted)/etc
echo -e "echo root:root | chpasswd
sed -i 's#/root:.*\$#/root:/bin/ash#' /etc/passwd
sed -i -e 's/#//' -e 's#askconsole:.*\$#askconsole:/bin/ash#' /etc/inittab
uci -q set \$(uci show firewall | grep -m 1 \$(fw3 -q print | \
egrep 'iptables -t filter -A zone_lan_input -p tcp -m tcp --dport 22 -m comment --comment \"!fw3: .+\" -j DROP' | \
sed -n -e 's/^iptables.\+fw3: \(.\+\)\".\+/\1/p') | \
sed -n -e \"s/\(.\+\).name='.\+'$/\1/p\").target='ACCEPT'
uci add dropbear dropbear
uci rename dropbear.@dropbear[-1]=afg
uci set dropbear.afg.enable='1'
uci set dropbear.afg.Interface='lan'
uci set dropbear.afg.Port='22'
uci set dropbear.afg.IdleTimeout='600'
uci set dropbear.afg.PasswordAuth='on'
uci set dropbear.afg.RootPasswordAuth='on'
uci set dropbear.afg.RootLogin='1'
uci set dropbear.lan.enable='0'
uci commit dropbear
/etc/init.d/dropbear enable
/etc/init.d/dropbear restart
rm /overlay/\$(cat /proc/banktable/booted)/etc/rc.local
source /rom/etc/rc.local
" > /overlay/$(cat /proc/banktable/booted)/etc/rc.local
chmod +x /overlay/$(cat /proc/banktable/booted)/etc/rc.local
sync
Now let the show begin. Initiate the flashing procedure:
# Erase and write new firmware into booted bank
mtd -e $(cat /proc/banktable/booted) write "/tmp/new.bin" $(cat /proc/banktable/booted)
# Emulate system crash to hard reboot
echo c > /proc/sysrq-trigger
When the process ends, the device will crash and reboot. First thing to do once you regain SSH access to it, is change the root password using:
passwdInstall Ansuel custom GUI (tch-nginx-gui)
As a final step, a custom GUI unlocking most of the router functionality is needed. Luckily for us, Ansuel did a great job developing one. You can find it on the GitHub page.
Making a long story short, first download the GUI from this page. I'll assume the archive lies at ~/download/GUI.tar.bz2.
Copy the archive to the device using SCP:
scp -O ~/download/GUI.tar.bz2 router:/tmp/GUI.tar.bz2Then SSH into the device and launch the following commands:
bzcat /tmp/GUI.tar.bz2 | tar -C / -xvf -
/etc/init.d/rootdevice force
Wait for the process to complete and reboot (if the device does not reboot by itself).
Congratulation the hard part is finished, your devices is rooter and its power completely unleashed. Have fun!
A bonus step: SQM
You probably noticed (or not, very luckily for you) that if you bomb router with packets, e.g. when someone else on the network is watching a 4K video, updating Windows or downloading something, the connection drops. That can be a real PITA if you are playing online or have a running download server.

This issue is called bufferbloat and affects a lot of routing devices. Read Best Bufferbloat Analogy - Ever to understand bufferbloat better.
The bad news is that you cannot really eliminate it, especially if you run a stock firmware. The good news is that since Homeware is basically OpenWrt, it is possible to install a package called SQM to mitigate bufferbloat. SQM stays for Smart Queue Management and is a term to group a series of algorithm used to manage packet queues (or really any queue) in a "nicer" way, considering package flow and congestion as parameters in the game.
Test for bufferbloat
Before pointing fingers, perform a bufferbloat test. There are some easy online tools for that:
- Waveform: it gives you a very informative score of your bufferbloat, but is a little biased due to wanting you to buy one of their devices.
- Fast: an unbiased Netflix tool to do a speed test and measure bufferbloat, once you press the Show more info link.
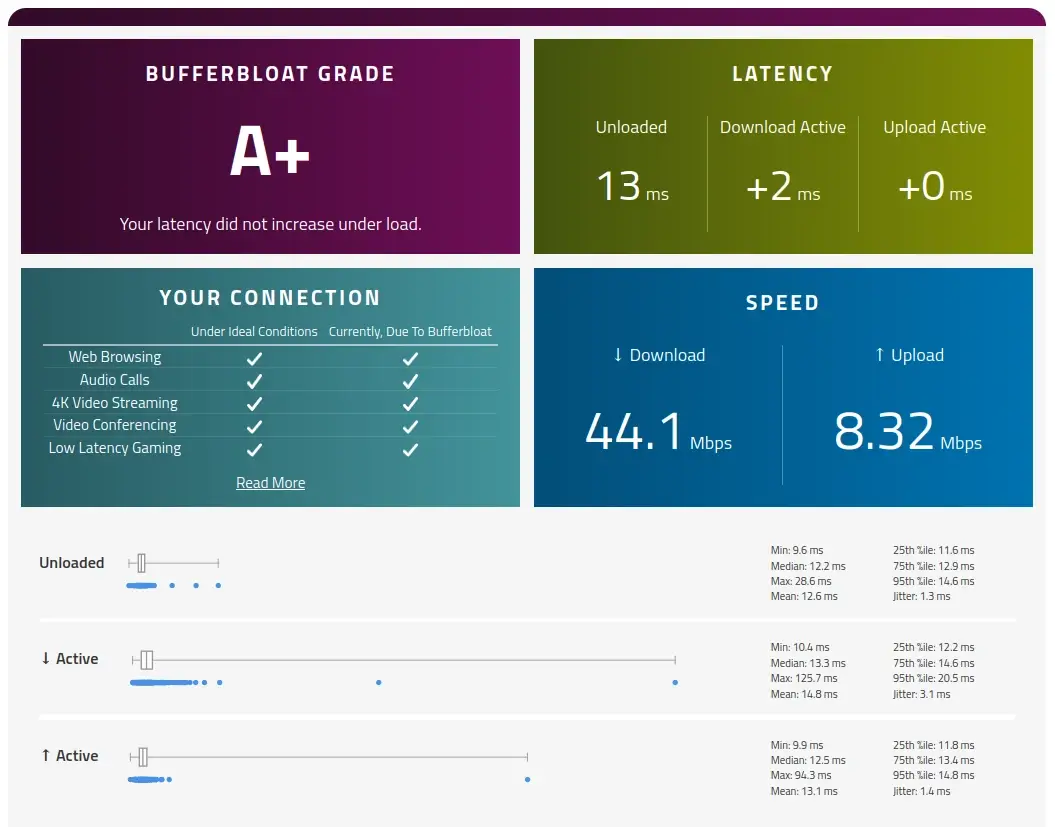
Once you identified bufferbloat as your culprit, proceed to apply the SQM fix.
Configure OpenWrt packages for Homeware 18
To install SQM, we can use the opkg package manager of OpenWrt. In the current state Homeware 18 is referencing an hardware branch that doesn't exist, so an opkg update will fail.
Luckily Macoers has provided some packages for the DGA4132 on Homeware 18.
SSH into the router as root.
Check that /etc/opkg.conf contains the following rows:
arch all 100
arch noarch 100
arch arm_cortex-a9 200
arch arm_cortex-a9_neon 300
Then, download the following IPK packages and proceed to install them all:
curl -k https://repository.macoers.com/homeware/18/brcm63xx-tch/VANTW/base/openssl-util_1.0.2t-1_arm_cortex-a9_neon.ipk --output /tmp/openssl-util_1.0.2t-1_arm_cortex-a9_neon.ipk
curl -k https://repository.macoers.com/homeware/18/brcm63xx-tch/VANTW/base/libopenssl_1.0.2t-1_arm_cortex-a9_neon.ipk --output /tmp/libopenssl_1.0.2t-1_arm_cortex-a9_neon.ipk
curl -k https://repository.macoers.com/homeware/18/brcm63xx-tch/VANTW/packages/wget_1.19.5-4_arm_cortex-a9_neon.ipk --output /tmp/wget_1.19.5-4_arm_cortex-a9_neon.ipk
opkg install --force-overwrite /tmp/*.ipk
Finally check that /etc/opkg.conf contains the following rows:
src/gz chaos_calmer_base_macoers https://repository.macoers.com/homeware/18/brcm63xx-tch/VANTW/base
src/gz chaos_calmer_packages_macoers https://repository.macoers.com/homeware/18/brcm63xx-tch/VANTW/packages
src/gz chaos_calmer_luci_macoers https://repository.macoers.com/homeware/18/brcm63xx-tch/VANTW/luci
src/gz chaos_calmer_routing_macoers https://repository.macoers.com/homeware/18/brcm63xx-tch/VANTW/routing
src/gz chaos_calmer_telephony_macoers https://repository.macoers.com/homeware/18/brcm63xx-tch/VANTW/telephony
src/gz chaos_calmer_core_macoers https://repository.macoers.com/homeware/18/brcm63xx-tch/VANTW/target/packages
If it does, do nothing. In case it doesn't, the best strategy is to put them inside the /etc/opkg/customfeeds.conf file.
Finally launch a opkg update.
Install SQM
To install the OpenWrt SQM package do:
opkg install sqm-scriptsThen enable it to start at boot and start it now:
/etc/init.d/sqm enable
/etc/init.d/sqm start
The fun part: trial and error
Installing SQM is not enough. For it to be effective, you should apply the right configuration.
Open the /etc/config/sqm file and edit the contents to your liking. I will post my configuration below, you can take it as example. I don't really understand all the values there, I just edited the interface name and download and upload speed.
config queue 'wan'
        option enabled '1'
        option interface 'wanptm0'
        option download '47500'
        option upload '9020'
        option qdisc 'fq_codel'
        option script 'simple.qos'
        option qdisc_advanced '0'
        option ingress_ecn 'ECN'
        option egress_ecn 'ECN'
        option qdisc_really_really_advanced '0'
        option itarget 'auto'
        option etarget 'auto'
        option linklayer 'none'
To find the interface name, just launch this command:
uci get network.wan.ifnameTo populate download and upload speeds, I used a trial and error process.
- Detach all your devices from perfoming any relevant network operations.
- Perform a speed test using Fast. Take note of the download and upload speeds, e.g. 50Mbps and 10Mbps.
- Populate
option downloadandoption uploadwith the obtained speed multiplied by 1000, e.g. 50000 and 10000. - Perform a Waveform bufferbloat test. This is your baseline score, e.g. F.
- Remove 1% from the uplink and downlink speeds. E.g. 49500 and 9900.
- Reload the SQM service using
/etc/init.d/sqm restart. - Retry from point 4, until you get better scores, e.g. A or A+.
If you reach an upper bound and you can't improve your score anymore, you can try applying a different percentage for downlink and uplink speeds. For reference my optimum percentages were 95% of download speed and 82% of upload.
You will pay some speed, but your network will maintain its performance even when under heavy load.
Useful links
The following are the sources of my information. Some of the links you can find directly in the related paragraph.
- Hacking Technicolor Gateways
- ilpuntotecnico DGA4132 forum topic [ITA]
- ilpuntotecnico DGA4132 unlock forum topic [ITA]
- ilpuntotecnico DGA4132 Type 3 or ??? guide [ITA]
- ilpuntotecnico Ansuel custom GUI forum topic [ITA]
- Ansuel custom GUI repository
- SQM on DGA4132 [ITA]
- OpenWrt packages on Homeware 18 [ITA]
- Waveform bufferbloat test